书单推荐:成为Java顶级程序员架构师 ,这20来本(高薪)必看点击获取
我的环境
* JDK 1.8
* maven 3.6.0
* node环境
1.为什么需要前后端项目开发时分离,部署时合并?
在一些公司,部署实施人员的技术无法和互联网公司的运维团队相比,由于各种不定的环境也无法做到自动构建,容器化部署等。因此在这种情况下尽量减少部署时的服务软件需求,打出的包数量也尽量少。针对这种情况这里采用的在开发中做到前后端独立开发,打包时在后端springboot打包发布时将前端的构建输出一起打入,最后只需部署springboot的项目即可,无需再安装nginx服务器
在这里我有两种方式,一种是简单的,一种是复杂的,下边先来看一个简单的例子:
1)前端开发好后将build构建好的dist下的文件拷贝到springboot的resources的static下(boot项目默认没有static,需要自己新建)
操作步骤:前端vue项目使用命令 npm run build 或者 cnpm run build 打包生成dist文件,在springboot项目中resources下建立static文件夹,将dist文件中的文件复制到static中,然后去application中跑起来boot项目,这样直接访问index.html就可以访问到页面(api接口请求地址自己根据情况打包时配置或者在生成的dist文件中config文件夹中的index.js中配置)
项目结构如图:

鼠标选中的这几个就是从dist文件中复制过来的前端的包,然后我们直接启动boot项目就可以通过index.html访问了(ps:上面这是最简单的合并方式,但是如果作为工程级的项目开发,并不推荐使用手工合并,也不推荐将前端代码构建后提交到springboot的resouce下,好的方式应该是保持前后端完全独立开发代码,项目代码互不影响,借助jenkins这样的构建工具在构建springboot时触发前端构建并编写自动化脚本将前端webpack构建好的资源拷贝到springboot下再进行jar的打包,最后就得到了一个完全包含前后端的springboot项目了。不过上述方法操作简单,便于使用,如果想一次性打包完成的话,就看第二种)
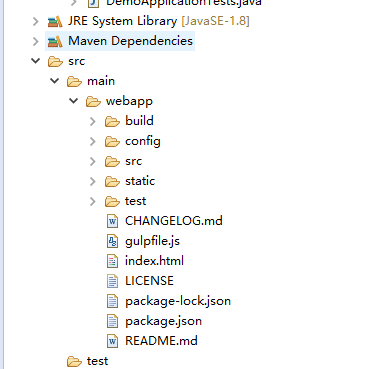
2:第二种方法是在src/main下建立一个webapp文件夹,然后将前端项目的源文件复制到该文件夹下,具体结构如图:

然后使用maven命令执行本地node打包命令,这样就可以 在执行mvn clean package命令时,利用maven插件执行cnpm run build命令(我是使用的淘宝的镜像cnpm,国外的npm命令会相对慢一些,大家根据自己的条件选择,具体命令请看项目中前端vue文件的README.md),一次性完成整个过程
实现方法是这样的,我们要引入org.codehaus.mojo插件来进行maven调用node命令,pom.xml中为:
<plugin>
        <groupId>org.codehaus.mojo</groupId>
        <artifactId>exec-maven-plugin</artifactId>
        <executions>
          <execution>
            <id>exec-cnpm-install</id>
            <phase>prepare-package</phase>
            <goals>
              <goal>exec</goal>
            </goals>
            <configuration>
              <executable>${cnpm}</executable>
              <arguments>
                <argument>install</argument>
              </arguments>
              <workingDirectory>${basedir}/src/main/webapp</workingDirectory>
            </configuration>
          </execution>
          <execution>
            <id>exec-cnpm-run-build</id>
            <phase>prepare-package</phase>
            <goals>
              <goal>exec</goal>
            </goals>
            <configuration>
              <executable>${cnpm}</executable>
              <arguments>
                <argument>run</argument>
                <argument>build</argument>
              </arguments>
              <workingDirectory>${basedir}/src/main/webapp</workingDirectory>
            </configuration>
          </execution>
        </executions>
      </plugin>
然后maven-resources-plugin插件将项目的前端文件打包到boot项目的classes中,具体的请参考pom.xml中的,
将webapp/dist文件夹中的文件复制到src/main/resources/static中,并打包到classes
<!--copy文件到指定目录下 -->
      <plugin>
        <groupId>org.apache.maven.plugins</groupId>
        <artifactId>maven-resources-plugin</artifactId>
        <configuration>
          <encoding>${project.build.sourceEncoding}</encoding>
        </configuration>
        <executions>
          <execution>
            <id>copy-spring-boot-webapp</id>
            <!-- here the phase you need -->
            <phase>validate</phase>
            <goals>
              <goal>copy-resources</goal>
            </goals>
            <configuration>
              <encoding>utf-8</encoding>
              <outputDirectory>${basedir}/src/main/resources/static</outputDirectory>
              <resources>
                <resource>
                  <directory>${basedir}/src/main/webapp/dist</directory>
                </resource>
              </resources>
            </configuration>
          </execution>
        </executions>
      </plugin>
然后通过maven命令:
mvn clean package -P window
打包成功后我们的前端项目就整个的打包到了boot项目的jar包中,然后启动项目,访问index.html页面就看到了项目启动成功。
打出来的jar包中如果static说明打包由于种种原因失败了,我就遇到过几次,这时候需要再来一次 mvn clean package -P window
ps:下面看下SprintBoot 整合vue实现上传下载
这里记录一下在Springboot中实现文件上传下载的核心代码
package com.file.demo.springbootfile;
import com.file.util.ResultUtil;
import org.apache.commons.lang.exception.ExceptionUtils;
import org.apache.tomcat.util.http.fileupload.IOUtils;
import org.apache.tomcat.util.http.fileupload.util.Streams;
import org.slf4j.Logger;
import org.slf4j.LoggerFactory;
import org.springframework.web.bind.annotation.RequestMapping;
import org.springframework.web.bind.annotation.RequestParam;
import org.springframework.web.bind.annotation.RestController;
import org.springframework.web.multipart.MultipartFile;
import javax.servlet.http.HttpServletRequest;
import javax.servlet.http.HttpServletResponse;
import java.io.*;
/*
* springboot整合vue,文件上传下载
* */
//上传不要用@Controller,用@RestController
@RestController
@RequestMapping("/file")
public class FileController {
  private static final Logger logger = LoggerFactory.getLogger(FileController.class);
  //在文件中,不用/或者\最好,推荐使用File.separator
  private final static String fileDir="files";
  private final static String rootPath = System.getProperty("user.home")+ File.separator+fileDir+File.separator;
  /*
  * 文件上传
  * */
  @RequestMapping("/upload")
  public Object uploadFile(@RequestParam("file")MultipartFile[] multipartFiles, final HttpServletResponse response, final HttpServletRequest request){
    File fileDir = new File(rootPath);
    /*
    * exists():测试此抽象路径名表示的文件是否存在
    * isDirectory():检查一个对象是否是文件夹
    * isFile():判断是否为文件,也可能是文件目录
    * */
    if(!fileDir.exists() && !fileDir.isDirectory()){
      //检查到文件不存在则创建
      fileDir.mkdir();//创建文件,一级
      fileDir.mkdirs();//创建多级
    }
    try{
      if(multipartFiles != null && multipartFiles.length > 0){
        for ( int i = 0;i<multipartFiles.length;i++){
          try{
            String storagePath = rootPath+multipartFiles[i].getOriginalFilename();
            logger.info("上传的文件:" + multipartFiles[i].getName()+","+multipartFiles[i].getContentType()+","
                +multipartFiles[i].getOriginalFilename() + ",保持的路径为:" + storagePath);
            Streams.copy(multipartFiles[i].getInputStream(), new FileOutputStream(storagePath), true);
          }catch (IOException e){
            logger.info(ExceptionUtils.getFullStackTrace(e));
          }
        }
      }
    }catch (Exception e){
      return ResultUtil.error(e.getMessage());
    }
    return ResultUtil.success("上传成功!");
  }
  /*
  * 文件下载
  * */
  @RequestMapping("/download")
  public Object downkiadFile(@RequestParam String fileName,final HttpServletResponse response,final HttpServletRequest request){
    OutputStream os = null;
    InputStream is = null;
    try{
      //获取输出流rootPath
      os = response.getOutputStream();
      //重置输出流
      response.reset();
      response.setContentType("application/x-download;charset=GBK");
      response.setHeader("Content-Disposition", "attachment;filename="+ new String(fileName.getBytes("utf-8"), "iso-8859-1"));
      //读取流
      File f= new File(rootPath+fileName);
      is = new FileInputStream(f);
      if(is == null){
        logger.error("下载文件失败,请检查文件“"+ fileName +"”是否存在");
        return ResultUtil.error("下载附件失败,请检查文件“" + fileName + "”是否存在");
      }
      //复制文件
      IOUtils.copy(is,response.getOutputStream());
      //刷新缓冲
      response.getOutputStream().flush();
    }catch (IOException e){
      return ResultUtil.error("下载文件失败,error:" + e.getMessage());
    }
    //文件的关闭在finally中执行
    finally {
      {
        try {
          if(is != null){
            is.close();
          }
        }catch (IOException e){
          logger.error(ExceptionUtils.getFullStackTrace(e));
        }
        try{
          if(os != null){
            os.close();
          }
        }catch (IOException e){
          logger.info(ExceptionUtils.getFullStackTrace(e));
        }
      }
    }
    return null;
  }
}
源码下载地址: https://github.com/struggle0903/SpringBootfiledemo.git
总结
以上所述是小编给大家介绍的Springboot项目与vue项目整合打包的实现方式,希望对大家有所帮助,如果大家有任何疑问请给我留言,小编会及时回复大家的。在此也非常感谢大家对谷谷点程序网站的支持!
如果你觉得本文对你有帮助,欢迎转载,烦请注明出处,谢谢!
转载请注明:谷谷点程序 » Springboot项目与vue项目整合打包的实现方式
