书单推荐:成为Java顶级程序员架构师 ,这20来本(高薪)必看点击获取
为何模块开发
先举个栗子,同一张数据表,可能要在多个项目中或功能中使用,所以就有可能在每个模块都要搞一个mybatis去配置。如果一开始规定说这张表一定不可以改字段属性,那么没毛病。但是事实上, 一张表从项目开始到结束,不知道被改了多少遍,所以,你有可能在多个项目中去改mybatis改到吐血!
在举一个栗子,一个web服务里包含了多个功能模块,比如其中一个功能可能会消耗大量资源和时间,当用户调用这个功能的时候,可能会影响到其他功能的正常使用,这个时候,如果把各个功能模块分出来单独部署,然后通过http请求去调用,至于性能和响应速度,再单独去优化,将会非常爽!这也有利于将来的
分布式集群
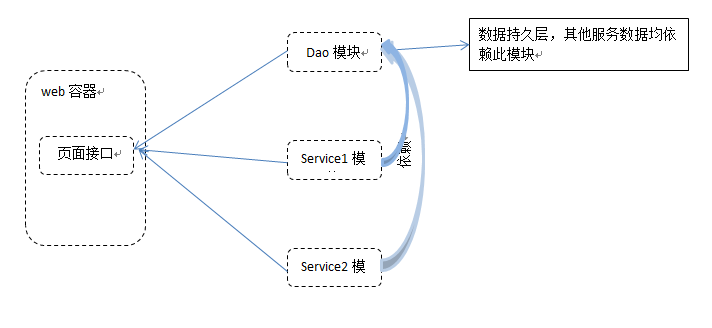
根据当前的业务需求,我需要重构现有的web功能,多模块化,然后单独部署,基本架构示意图如下

怎样分模块
注意:下面配置的步骤是基于IntelliJ IDEA 2016.3.4(64),不保证eclipse能成功。如果你还在使用eclipse,建议你删掉它,使用idea吧
1、创建maven主项目例如,springbootmodules,并删掉src文件
2、右键项目分别创建三个module,dao,service1,service2
3、将之前项目用到的依赖写在主项目的pom里,这里要注意
4、dao层主要提供实体类,CURD接口和xml映射文件
5、一定要在service1和service2配置数据库的相关信息,并添加spring的相关配置
6、编写接口测试
相关代码
父项目pom
<?xml version="1.0" encoding="UTF-8"?>
<project xmlns="http://maven.apache.org/POM/4.0.0"
         xmlns:xsi="http://www.w3.org/2001/XMLSchema-instance"
         xsi:schemaLocation="http://maven.apache.org/POM/4.0.0 http://maven.apache.org/xsd/maven-4.0.0.xsd">
    <artifactId>quick-modules</artifactId>
    <groupId>com.quick</groupId>
    <packaging>pom</packaging>
    <version>1.0-SNAPSHOT</version>
    <modelVersion>4.0.0</modelVersion>
    <modules>
        <module>dao</module>
        <module>service1</module>
        <module>service2</module>
        <module>test</module>
    </modules>
    <properties>
        <java.version>1.8</java.version>
        <mybatis-spring-boot>1.3.1</mybatis-spring-boot>
        <mysql-connector>5.1.39</mysql-connector>
        <junit.version>junit</junit.version>
        <commons-pool2.versoin>2.4.2</commons-pool2.versoin>
        <commons-beanutils.version>1.9.2</commons-beanutils.version>
        <commons-logging.version>1.2</commons-logging.version>
        <commons-dbcp.version>1.4</commons-dbcp.version>
        <fastjson.version>1.2.7</fastjson.version>
    </properties>
    <parent>
        <groupId>org.springframework.boot</groupId>
        <artifactId>spring-boot-starter-parent</artifactId>
        <version>1.5.1.RELEASE</version>
        <relativePath/> <!-- lookup parent from repository -->
    </parent>
    <!-- dependencyManagement 可以把所有子模块用到的依赖都声明在此包括版本号,然后子模块需要显式的引用但不需要配置版本号!!! -->
    <dependencyManagement>
        <dependencies>
            <!-- 子模块的依赖管理 -->
            <dependency>
                <groupId>com.quick</groupId>
                <artifactId>quick-modules-dao</artifactId>
                <version>${project.version}</version>
            </dependency>
            <dependency>
                <groupId>com.quick</groupId>
                <artifactId>quick-modules-service1</artifactId>
                <version>${project.version}</version>
            </dependency>
            <dependency>
                <groupId>com.quick</groupId>
                <artifactId>quick-modules-service2</artifactId>
                <version>${project.version}</version>
            </dependency>
            <dependency>
                <groupId>org.mybatis.spring.boot</groupId>
                <artifactId>mybatis-spring-boot-starter</artifactId>
                <version>${mybatis-spring-boot}</version>
            </dependency>
            <!-- Junit -->
            <dependency>
                <groupId>junit</groupId>
                <artifactId>junit</artifactId>
                <version>${junit.version}</version>
            </dependency>
            <dependency>
                <groupId>org.apache.commons</groupId>
                <artifactId>commons-pool2</artifactId>
                <version>${commons-pool2.versoin}</version>
            </dependency>
            <dependency>
                <groupId>commons-beanutils</groupId>
                <artifactId>commons-beanutils</artifactId>
                <version>${commons-beanutils.version}</version>
            </dependency>
            <dependency>
                <groupId>commons-logging</groupId>
                <artifactId>commons-logging</artifactId>
                <version>${commons-logging.version}</version>
            </dependency>
            <dependency>
                <groupId>commons-dbcp</groupId>
                <artifactId>commons-dbcp</artifactId>
                <version>commons-dbcp.version</version>
            </dependency>
            <dependency>
                <groupId>com.alibaba</groupId>
                <artifactId>fastjson</artifactId>
                <version>${fastjson.version}</version>
            </dependency>
        </dependencies>
    </dependencyManagement>
    <!-- 参照官网:https://help.sonatype.com/repomanager3/maven-repositories -->
    <distributionManagement>
        <repository>
            <id>nexus</id>
            <name>Releases</name>
            <url>http://nexus.wangxc.club:8081/repository/maven-releases</url>
        </repository>
        <snapshotRepository>
            <id>nexus</id>
            <name>Snapshot</name>
            <url>http://nexus.wangxc.club:8081/repository/maven-snapshots</url>
        </snapshotRepository>
    </distributionManagement>
    <pluginRepositories>
        <pluginRepository>
            <id>nexus</id>
            <name>Nexus Plugin Repository</name>
            <url>http://nexus.wangxc.club:8081/repository/maven-public/</url>
            <snapshots>
                <enabled>true</enabled>
            </snapshots>
            <releases>
                <enabled>true</enabled>
            </releases>
        </pluginRepository>
    </pluginRepositories>
    <build>
        <plugins>
            <!-- 生成sources源码包的插件 -->
            <plugin>
                <groupId>org.apache.maven.plugins</groupId>
                <artifactId>maven-source-plugin</artifactId>
                <version>2.4</version>
                <configuration>
                    <attach>true</attach>
                </configuration>
                <executions>
                    <execution>
                        <id>attach-sources</id>
                        <!--意思是在什么阶段打包源文件-->
                        <phase>package</phase>
                        <goals>
                            <goal>jar-no-fork</goal>
                        </goals>
                    </execution>
                </executions>
            </plugin>
        </plugins>
    </build>
</project>
dao模块的pom(里面配置了mybatis的逆向功能插件)
<?xml version="1.0" encoding="UTF-8"?>
<project xmlns="http://maven.apache.org/POM/4.0.0"
         xmlns:xsi="http://www.w3.org/2001/XMLSchema-instance"
         xsi:schemaLocation="http://maven.apache.org/POM/4.0.0 http://maven.apache.org/xsd/maven-4.0.0.xsd">
    <parent>
        <artifactId>springbootquick</artifactId>
        <groupId>com.boot.lean</groupId>
        <version>1.0-SNAPSHOT</version>
    </parent>
    <modelVersion>4.0.0</modelVersion>

    <artifactId>dao</artifactId>
    <packaging>jar</packaging>

    <build>
    <!-- 一定要声明如下配置-->
        <resources>
            <resource>
                <directory>src/main/java</directory>
                <includes>
                    <include>**/*.xml</include>
                </includes>
            </resource>
            <resource>
                <directory>src/main/resources</directory>
            </resource>
        </resources>
    </build>
</project>
service1和service2的pom一样
<?xml version="1.0" encoding="UTF-8"?>
<project xmlns="http://maven.apache.org/POM/4.0.0"
         xmlns:xsi="http://www.w3.org/2001/XMLSchema-instance"
         xsi:schemaLocation="http://maven.apache.org/POM/4.0.0 http://maven.apache.org/xsd/maven-4.0.0.xsd">
    <parent>
        <artifactId>quick-modules</artifactId>
        <groupId>com.quick</groupId>
        <version>1.0-SNAPSHOT</version>
    </parent>
    <modelVersion>4.0.0</modelVersion>
    <packaging>jar</packaging>
    <artifactId>quick-modules-service1</artifactId>


    <dependencies>

        <!-- Spring Boot Web 依赖 -->
        <dependency>
            <groupId>org.springframework.boot</groupId>
            <artifactId>spring-boot-starter-web</artifactId>
        </dependency>

        <dependency>
            <groupId>com.quick</groupId>
            <artifactId>quick-modules-dao</artifactId>
        </dependency>

        <dependency>
            <groupId>org.mybatis.spring.boot</groupId>
            <artifactId>mybatis-spring-boot-starter</artifactId>
        </dependency>

        <dependency>
            <groupId>org.mybatis.spring.boot</groupId>
            <artifactId>mybatis-spring-boot-starter</artifactId>
            <version>${mybatis-spring-boot}</version>
        </dependency>

        <!--注意此处的引入,没有设置版本号,因为在父pom已经配置了-->
        <dependency>
            <groupId>com.alibaba</groupId>
            <artifactId>fastjson</artifactId>
        </dependency>
    </dependencies>
    <build>
        <plugins>
            <plugin>
                <groupId>org.springframework.boot</groupId>
                <artifactId>spring-boot-maven-plugin</artifactId>
            </plugin>
        </plugins>
    </build>
</project>
需要注意的是,service模块里用的是注解配置
注意service中引入dao模块时候spring对mapper的扫描配置,建议最好加上MapperScan这个注解即使你这个service的包名跟dao里的一样
@SpringBootApplication
@MapperScan("com.modules.dao")
public class Application {
	public static void main(String[] args) {
		SpringApplication.run(Application.class);
	}
}
发布
发布的时候需要在maven里的setting配置下权限,参照官网给的示例,一步到位
<settings>
  <servers>
    <server>
      <id>nexus</id>
      <username>admin</username>
      <password>admin123</password>
    </server>
  </servers>
  <mirrors>
    <mirror>
      <!--This sends everything else to /public -->
      <id>nexus</id>
      <mirrorOf>*</mirrorOf>
      <url>http://localhost:8081/repository/maven-public/</url>
    </mirror>
  </mirrors>
  <profiles>
    <profile>
      <id>nexus</id>
      <!--Enable snapshots for the built in central repo to direct -->
      <!--all requests to nexus via the mirror -->
      <repositories>
        <repository>
          <id>central</id>
          <url>http://central</url>
          <releases><enabled>true</enabled></releases>
          <snapshots><enabled>true</enabled></snapshots>
        </repository>
      </repositories>
     <pluginRepositories>
        <pluginRepository>
          <id>central</id>
          <url>http://central</url>
          <releases><enabled>true</enabled></releases>
          <snapshots><enabled>true</enabled></snapshots>
        </pluginRepository>
      </pluginRepositories>
    </profile>
  </profiles>
  <activeProfiles>
    <!--make the profile active all the time -->
    <activeProfile>nexus</activeProfile>
  </activeProfiles>
</settings>
对于dao模块一定要先deploy到私服上才行,在dao根目录执行 mvn deploy 即可 为了展示如何引用,我创建了单独的test模块,供大家测试使用 你可以直接运行,也可以打包成jar包运行
打包测试
在父项目下执行maven命令
mvn package
service1和service2目录下分别会产生target文件,里面包含可执行jar包,分别执行
java -jar service1-1.0-SNAPSHOT
java -jar service2-1.0-SNAPSHOT
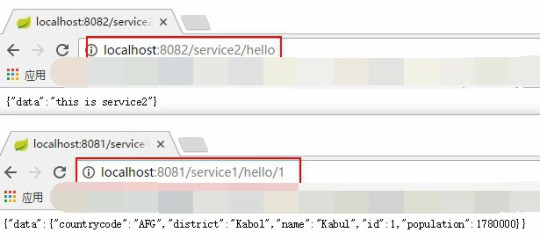
如果一切顺利的话,你可以得出下面的操作结果

