书单推荐:成为Java顶级程序员架构师 ,这20来本(高薪)必看点击获取
本文介绍了如何使用Spring Security OAuth2构建一个授权服务器来验证用户身份以提供access_token,并使用这个access_token来从资源服务器请求数据。
1.概述
OAuth2是一种授权方法,用于通过HTTP协议提供对受保护资源的访问。首先,OAuth2使第三方应用程序能够获得对HTTP服务的有限访问权限,然后通过资源所有者和HTTP服务之间的批准交互来让第三方应用程序代表资源所有者获取访问权限。
1.1 角色
OAuth定义了四个角色
资源所有者 - 应用程序的用户。
客户端 - 需要访问资源服务器上的用户数据的应用程序。
资源服务器 - 存储用户数据和http服务,可以将用户数据返回给经过身份验证的客户端。
授权服务器 - 负责验证用户的身份并提供授权令牌。资源服务器接受此令牌并验证您的身份。
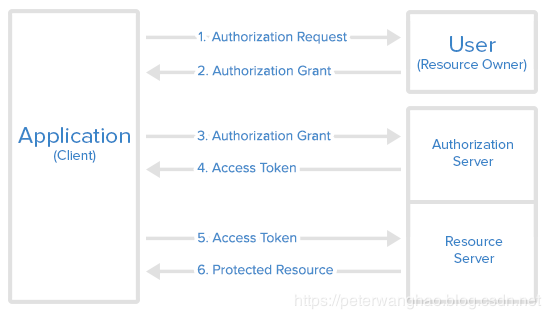
OAuth2的交互过程:

1.2 访问令牌与刷新令牌
访问令牌代表一个向客户授权的字符串。令牌包含了由资源所有者授予的权限范围和访问持续时间,并由资源服务器和授权服务器强制执行。
授权服务器向客户端发出刷新令牌,用于在当前访问令牌失效或过期时获取新的访问令牌,或获取具有相同或更窄范围的其他访问令牌,新的访问令牌可能具有比资源所有者授权的更短的生命周期和更少的权限。根据授权服务器的判断,发布刷新令牌是可选的。
访问令牌的责任是在数据到期之前访问它。
刷新令牌的责任是在现有访问令牌过期时请求新的访问令牌。
2. OAuth2 - 授权服务器
要使用spring Security OAuth2模块创建授权服务器,我们需要使用注解@EnableAuthorizationServer并扩展AuthorizationServerConfigurerAdapter类。
@Configuration
@EnableAuthorizationServer
public class OAuth2AuthorizationServer extends AuthorizationServerConfigurerAdapter {
	@Autowired
	private BCryptPasswordEncoder passwordEncoder;

	@Override
	public void configure(AuthorizationServerSecurityConfigurer security)
			throws Exception {
		security.tokenKeyAccess("permitAll()")
				.checkTokenAccess("isAuthenticated()")
				.allowFormAuthenticationForClients();
	}

	@Override
	public void configure(ClientDetailsServiceConfigurer clients)
			throws Exception {
		clients.inMemory().withClient("clientapp")
				.secret(passwordEncoder.encode("654321"))
				.authorizedGrantTypes("password", "authorization_code",
						"refresh_token")
				.authorities("READ_ONLY_CLIENT").scopes("read_user_info")
				.resourceIds("oauth2-resource")
				.redirectUris("http://localhost:8081/login")
				.accessTokenValiditySeconds(5000)
				.refreshTokenValiditySeconds(50000);
	}
}
Spring Security OAuth2会公开了两个端点,用于检查令牌(/oauth/check_token和/oauth/token_key),这些端点默认受保护denyAll()。tokenKeyAccess()和checkTokenAccess()方法会打开这些端点以供使用。
ClientDetailsServiceConfigurer用于定义客户端详细的服务信息,它可以在内存中或在数据库中定义。
在本例中我们使用了内存实现。它具有以下重要属性:
clientId - (必需)客户端ID。
secret - (可信客户端所需)客户端密钥(可选)。
scope - 客户受限的范围。如果范围未定义或为空(默认值),则客户端不受范围限制。
authorizedGrantTypes - 授权客户端使用的授权类型。默认值为空。
authorities - 授予客户的权限(常规Spring Security权限)。
redirectUris - 将用户代理重定向到客户端的重定向端点。它必须是绝对URL。
3. OAuth2 - 资源服务器
要创建资源服务器组件,请使用@EnableResourceServer注解并扩展ResourceServerConfigurerAdapter类。
@Configuration
@EnableResourceServer
public class OAuth2ResourceServer extends ResourceServerConfigurerAdapter {
	@Override
	public void configure(HttpSecurity http) throws Exception {
		http.authorizeRequests()
			.antMatchers("/").permitAll()
			.antMatchers("/api/**").authenticated();
	}
}
以上配置启用/api下所有端点的保护,但可以自由访问其他端点。
资源服务器还提供了一种对用户自己进行身份验证的机制。在大多数情况下,它通常是基于表单的登录。
@Configuration
@Order(1)
public class SecurityConfig extends WebSecurityConfigurerAdapter {

	@Override
	protected void configure(HttpSecurity http) throws Exception {
		http.antMatcher("/**")
				.requestMatchers()
				.antMatchers("/oauth/authorize**", "/login**", "/error**")
			.and()
				.authorizeRequests().anyRequest().authenticated()
			.and()
				.formLogin().permitAll();
	}

	@Override
	protected void configure(AuthenticationManagerBuilder auth)
			throws Exception {
		auth.inMemoryAuthentication().withUser("peterwanghao")
				.password(passwordEncoder().encode("123456")).roles("USER");
	}

	@Bean
	public BCryptPasswordEncoder passwordEncoder() {
		return new BCryptPasswordEncoder();
	}
}
4. OAuth2保护的REST资源
本例中只创建了一个RESTful API,它返回登录用户的姓名和电子邮件。
@Controller
public class RestResource {
	@RequestMapping("/api/users/me")
	public ResponseEntity<UserInfo> profile() {
		User user = (User) SecurityContextHolder.getContext().getAuthentication().getPrincipal();
		String email = user.getUsername() + "@126.com";

		UserInfo profile = new UserInfo();
		profile.setName(user.getUsername());
		profile.setEmail(email);

		return ResponseEntity.ok(profile);
	}
}
public class UserInfo {
private String name;
private String email;
public String getName() {
return name;
}
public void setName(String name) {
this.name = name;
}
public String getEmail() {
return email;
}
public void setEmail(String email) {
this.email = email;
}
@Override
public String toString() {
return "User [name=" + name + ", email=" + email + "]";
}
}5.演示
我们有一个API http://localhost:8080/api/users/me ,我们想通过第三方应用程序来访问API需要OAuth2令牌。
5.1 从用户获取授权许可代码
如上面的序列图所示,第一步是从URL获取资源所有者的授权:
http://localhost:8080/oauth/authorize?client_id=clientapp&response_type=code&scope=read_user_info
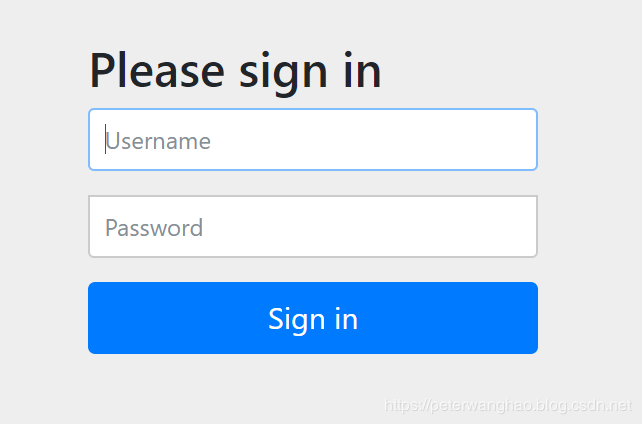
通过浏览器访问上面的URL地址,它将展现一个登录页面。提供用户名和密码。对于此示例,请使用“peterwanghao”和“123456”。

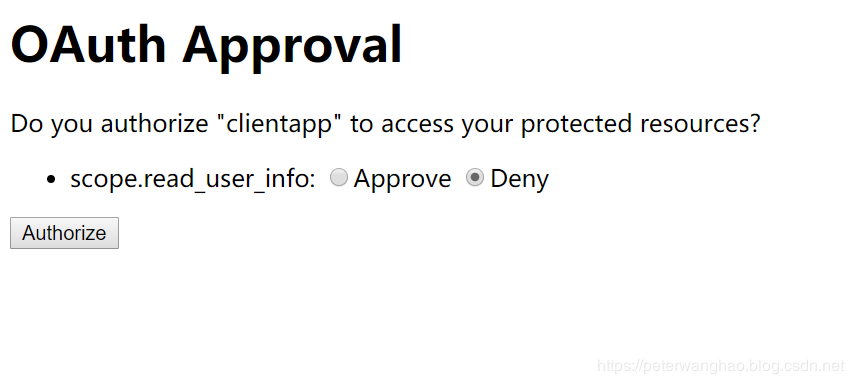
登录后,您将被重定向到授予访问页面,您可以在其中选择授予对第三方应用程序的访问权限。

它会重定向到URL,如:http://localhost:8081/login?code=TUXuk9 。这里'TUXuk9'是第三方应用程序的授权代码。
5.2 从授权服务器获取访问令牌
现在,应用程序将使用授权码来获取访问令牌。在这里,我们需要提出以下请求。使用此处第一步中获得的代码。
curl -X POST --user clientapp:654321 http://localhost:8080/oauth/token -H "content-type: application/x-www-form-urlencoded" -d "code=TUXuk9&grant_type=authorization_code&redirect_uri=http://localhost:8081/login&scope=read_user_info"
访问令牌响应
{
  "access_token": "168aad01-05dc-4446-9fba-fd7dbe8adb9e",
  "token_type": "bearer",
  "refresh_token": "34065175-1e92-4bb0-918c-a5a6ece1dc5f",
  "expires_in": 4999,
  "scope": "read_user_info"
}
5.3 从资源服务器访问用户数据
一旦我们有了访问令牌,我们就可以转到资源服务器来获取受保护的用户数据。
curl -X GET http://localhost:8080/api/users/me -H "authorization: Bearer 168aad01-05dc-4446-9fba-fd7dbe8adb9e"
获得资源响应
{
  "name":"peterwanghao",
  "email":"peterwanghao@126.com"
}
6.总结
本文讲解了OAuth2授权框架的实现机制,通过一个例子说明了第三方应用程序如何通过授权服务器的授权去资源服务器上获取受保护的数据。本例的完整代码在GitHub 上。
转载请注明:谷谷点程序 » Spring Security OAuth2认证授权示例详解
